


Bali Hut Umbrella Install

Concgadulations with your Bali Hut Umbrella !
Brisbane Thatch and Decks. Custom build thatched Bali Huts, Shigle roofs, Cape Reed Thatched Cabanas & Gazebos.
Brisbane Thatch and Decks is a proud Brisbane based business. With a relaxing lifestye in mind We design, supply and install Decks, Shingle roofing, Exotic African Cape Reed Thatched huts (Rondawels) & Tropical Island style Balinese Thatched Roof structures such as Bali Huts, Cabanas, Balinese Gazebo's, Pavilions or Pergolas at factory direct prices without compromising on quality. We focus to deliver a exceptional product, client service and satisfaction . We do all maintenance and repairs on all types Brushwood, Balinese and Cape reed Thatching.
Umbrella Install Instructions
Step 1
All timbers must be placed and joined with the markings facing up.
Begin by laying the 6 ring beam pieces on a flat area at the location where your Bali Hut is going.
Make sure the ring beams are flat and square, then attach them together using 2 x75mm from one side and 1 x 75mm batten screw from the other side through the face of one beam into the end of the adjoining beam.
Make sure it is square by measuring from corner to corner (the diagonal measurements should both be the same).
.png)
Step 3
Insert the King post (square 100mm block) or ridge beam (the large beam made of 2 pieces screwed together with an extension piece of timber on the top) into the center of the 6 hips.
The bottom king post should be 30mm higher than the bottom of the upper end of the hips.
Once they are all lined up screw together with 100mm batten screws.
.png)
Step 2 Hips
Assemble the hips as follows,
The hips are the double pieces screwed together with point one end and inverse on the other.
Place the pointed end snugly into the upper corner of the ring beam with the line marked side facing up. Ensure top of the hip sides are level with the top of the ring beam hold hip in position while attaching with 2 X 100mm batten screws, screwed through both sides of the ring beam into hip.
.png)
.png)
Step 5 Post
Plant the post: Decide the position of the Balinese Umbrella and dig a hole 350 diameter and 900mm deep. Plant post in the hole with concrete (not supplied).

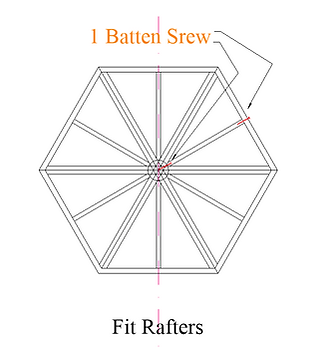
Step 4 Rafters
Starting with the longest rafters (line marked side faces up) place the lower end against the inside of the ring beam and the top against the hips/ridge beam, pencil lines on the ring beam give an approximate location, check and adjust where necessary using a set square so the rafters are at 90 degrees to the ring beam, the top outer edge of the rafter should be flush with the top of the ring beam.
Screw together using 75 or 100mm batten screw through ring beam and 100mm batten screw through top of rafter into the king post.

Step 6 Fit Frame
Measure the distance from the bottom of the king post to the floor and ad 2100mm. (or if you desire another height for your umbrella).
Measure from the floor to the top of the post, trim the post to desired length.
Lift the frame over the post and let it sink into the opening on the bottom of the king post left by the hips.
Insert 3 ea 100mm Batten screws at a angle through the king post into the post.
Level the frame and fit the knee braces supplied.

Balinese thatch - Installation Instructions
Balinese thatch, supplied in strips of 2.5m (horizontally) by 0.8m (vertically). The Alang-Alang grass is woven around a bamboo batten, which is 2.5m long. The Alang-Alang grass provides over-hang of 0.5m.
Start thatching from the bottom on any one side and work your way up.
*IMPORTANT *
The string side faces down; the visible bamboo tie rail faces up.
Don't use the 100mm nails supplied for the mud-bugs to nail down the thatch.
The first strip goes on the fist line marked up from the bottom of the rafters, on the pre-marked pencil lines, with the end covering half the hip beam.
Attach the thatch strips to the rafters & hips by nailing or stapling them through each bamboo batten. Your strip spacing, (batten spacing), should be 75-100 mm apart as per the pre-marked pencil lines.
(If you do not have access to a 50mm Stapel gun use very common and accessible nail gun (or Brad nailer) firing 50mm 15 Gauge Brad nails)


2) Cut the strip off at the center of the furthest rafter (or hip if it reaches)


3) The bamboo battens can be sawn or cut to the required length, with no need to bind or tie them after cutting. (long garden tree branch loppers work well)
4) Continue up the roof until one full strip spans hip centre to hip centre.
By now you should have the complete lower area of one side covered except for a small triangle, cut strip pieces to thatch this triangle before continuing up the roof.
Continue up the roof starting each strip at hip centre and cutting strip at center of other hip, keeping the off cuts in order.
You will reach a point where the off cut is about half the strip length; (i.e. 1.4m) this off cut then becomes your next piece of thatch to attach.
From there on up your saved off cuts should fit all the way to the top, remember to cut each one at the centre of the hip. (If you have a lot of long off cuts left over give us a call before continuing as you are doing something wrong.)
Once you have finished one side repeat the process for all 4 sides.

CONGRATULATIONS
YOU HAVE NOW COMPLETED THE STRIP THATCHING STEP II MUD-BUGS


-
“Mudbugs” or hip covers are bundles of the Alang-Alang grass that are used to fill-in the corners (hip joints). These bundles need to be nailed or secured-in. Each bundle needs to be tied around with wire and a long nail (supplied) or screw. The bundles then are nailed or screwed onto the corner rafters.
PREPARING THE MUDBUGS
Cut a piece of tie wire long enough to go twice around the mudbug (at the cut end of the thatch) plus about 100mm for twisting.
100mm along the length of wire wrap it once tightly around the 100mm (supplied)nail just under the nail head.
Push the nail through the middle of the mudbug about 100mm from the cut end of the mudbug.
Wrap the wire tightly around the mudbug twice, twisting the 2 ends together with pliers.
IT IS IMPORTANT THAT THE TIE WIRE IS VERY TIGHTLY TWISTED
TO PREVENT THE MUDBUD GRASS FALLING OUT IN WINDS ETC.
2) Once you have the mudbugs tied, start by nailing one to the bottom of the hip beam, checking that the mudbug thatch overhang is the same length as the thatch overhang at the bottom.
You need to hammer the nail a long way in, so that it pulls the wire tightly and actually starts to squash the mudbug into an oval shape. The using your hammer, splay the mudbug out so that it covers the whole bottom corner.
Then start your way up the hip nailing one mudbug about every 250 - 300mm above the last one..
At the top you should end with on mudbug on each hip...


3) After finishing each hip, Fit another 8 mudbugs around the top of the king post covering the top of the mudbugs that you finished the hips with. Nail one mudbugs to each flat end of the king post and another one on each corners.
Make sure they tidy and level on top so you can fit the crown over them.
4) Finally, place the Balinese crown (if you have one) right on the top, you can use a bead of silicon around the base to help hold it on if you are in a really windy location.
To finish, you can water the roof down (subject to water restrictions) and rake it with steel garden rake while it is wet, this will remove any loose thatch and start the straightening process.
It usually takes a few weeks, some rain, and a few rakes for the
thatch to straighten out properly.


5) Should you experience any difficulties, please do not hesitate to contact one of our staff at Brisbane Thatch and Decks,
041 721 9091
Sit back, relax, and enjoy your new home built Brisbane Thatch and Decks Gazebo